Deploy CockroachDB on Brightbox
This guide takes you through manually deploying a secure multi-node CockroachDB cluster on Brightbox, using Brightbox’s managed load balancing service to distribute client traffic. This guide uses the Brightbox command line tool but you can do everything with the Control Panel too if you prefer.
Requirements
Locally, you must have CockroachDB installed, which you’ll use to generate and manage your deployment’s certificates.
Within Brightbox, you must have SSH access to each server. This is necessary for distributing binaries and starting CockroachDB. If you have IPv6 then you already have direct access to any Cloud Server you create, but if you’re IPv4 only you’ll need to create and map Cloud IPs to each cloud server.
Recommendations
For guidance on CockroachDB cluster topology, clock synchronization, and file descriptor limits, see the recommended production settings documentation.
Create your Server Group
We’ll be putting all CockroachDB servers into a server group to make it easier to manage them, so we’ll create that first.
$ brightbox groups create -n 'CockroachDB Cluster'

Creating a new server group
id         server_count  name
----------------------------------------------
grp-sfryl  0             CockroachDB Cluster
----------------------------------------------
Setup firewall access
Then we’ll create a firewall policy for the new group and apply it:
$ brightbox firewall-policies create -n 'CockroachDB Cluster'

id         server_group  name
----------------------------------------------
fwp-n6vdj                CockroachDB Cluster
----------------------------------------------

$ brightbox firewall-policies apply fwp-n6vdj grp-sfryl

id         server_group  name
----------------------------------------------
fwp-n6vdj  grp-sfryl     CockroachDB Cluster
----------------------------------------------
CockroachDB requires TCP communication on two ports: 26257 is for cluster
communication and 8080 is for exposing your Admin UI.
Now we add rules to the firewall policy for SSH, ICMP messages, outbound access and intra-group access:
$ brightbox firewall-rules create -d any fwp-n6vdj

id         protocol  source  sport  destination  dport  icmp_type  descrip...
-------------------------------------------------------------------------------
fwr-pdkr2  -         -       -      any          -      -
-------------------------------------------------------------------------------

$ brightbox firewall-rules create -s any -p icmp -i any fwp-n6vdj

id         protocol  source  sport  destination  dport  icmp_type  descrip...
-------------------------------------------------------------------------------
fwr-u4ja1  icmp      any     -      -            -      any
-------------------------------------------------------------------------------

$ brightbox firewall-rules create -s any -p tcp -e 22 fwp-n6vdj

id         protocol  source  sport  destination  dport  icmp_type  descrip...
-------------------------------------------------------------------------------
fwr-mexlo  tcp       any     -      -            22     -
-------------------------------------------------------------------------------

$ brightbox firewall-rules create -s grp-sfryl fwp-n6vdj

id         protocol  source     sport  destin...  dport  icmp_type  descri...
-------------------------------------------------------------------------------
fwr-jlqoa  -         grp-sfryl  -      -          -      -
-------------------------------------------------------------------------------
Create servers
Now we create the servers that will make up the cluster and put them in the server group. We recommend running at least three nodes to ensure high availability, and that at least one of the nodes is in a different zone from the other two. For this guide, we’ll be creating three 1GB servers running Ubuntu 16.04 for this guide.
First find the latest Ubuntu 16.04 official image:
$ brightbox images | grep ubuntu-xenial-16.04-amd64-server

img-i935j  brightbox  official  2017-06-21  public  2252   ubuntu-xenial-16.04-amd64-server (x86_64)
img-1rha3  brightbox  official  2017-06-21  public  2252   ubuntu-xenial-16.04-amd64-server-uefi1 (x86_64)
Then create the servers using the image identifier:
$ brightbox server create -t 1gb.ssd -i 3 -g grp-sfryl -n "CockroachDB" img-i935j

Creating 3 1gb.ssd (typ-8985i) servers with image ubuntu-xenial-16.04-amd64-server (img-i935j) in groups grp-sfryl

id         status    type     zone    created_on  image_id   cloud_ip_ids  name
--------------------------------------------------------------------------------------
srv-qsscs  creating  1gb.ssd  gb1s-a  2017-07-05  img-i935j                CockroachDB
srv-cgjl1  creating  1gb.ssd  gb1s-a  2017-07-05  img-i935j                CockroachDB
srv-xbhok  creating  1gb.ssd  gb1s-b  2017-07-05  img-i935j                CockroachDB
--------------------------------------------------------------------------------------
Set up load balancing
Any CockroachDB node can be used as as a SQL client gateway to your cluster, but to ensure performance and reliability, it’s important to use a load balancer
Load balancers spread client traffic across nodes which prevents any one node from being overwhelmed by requests and improves overall cluster performance. And they decouple client health from the health of a single CockroachDB node. In cases where a node fails, the load balancer redirects client traffic to available nodes.
To achieve all this we can simply create a Brightbox Load Balancer. We’ll
configure it with one listener in TCP mode, for port 26257 and with a HTTP
health check watching the admin service /health endpoint on port 8080.
$ brightbox lbs create -n "CockroachDB Cluster" -l 26257:26257:tcp:50000 \
    --hc-type=http --hc-request=/health --hc-port=8080 srv-qsscs srv-cgjl1 srv-xbhok

Creating a new load balancer

id         status    created_on  cloud_ips  nodes                            name
--------------------------------------------------------------------------------------------------
lba-imldo  creating  2017-07-05             srv-qsscs, srv-cgjl1, srv-xbhok  CockroachDB Cluster
--------------------------------------------------------------------------------------------------
Then we need to give the load balancer access to the CockroachDB services using
a new firewall rule. Use the new load balancer identifier as the source,
destination TCP ports of 26257 and 8080 and add it to the firewall policy we created earlier:
$ brightbox firewall-rules create -p tcp -s lba-imldo --dport=8080,26257 fwp-n6vdj

id         protocol  source     sport  destination  dport       icmp_type  description
----------------------------------------------------------------------------------------
fwr-74knr  tcp       lba-imldo  -      -            8080,26257  -
----------------------------------------------------------------------------------------
Create and map a Cloud IP
Now we create a Cloud IP and map it to the load balancer:
$ brightbox cloudip create -n "CockroachDB"

id         status    public_ip       destination  reverse_dns            name
-------------------------------------------------------------------------------------
cip-rycr6  unmapped  109.107.39.127               cip-109-107-39-127...  CockroachDB
-------------------------------------------------------------------------------------

$ brightbox cloudip map cip-rycr6 lba-imldo

Mapping cip-rycr6 to destination lba-imldo

id         status    public_ip       destination  reverse_dns            name
-------------------------------------------------------------------------------------
cip-rycr6  mapped    109.107.39.127  lba-imldo    cip-109-107-39-127...  CockroachDB
-------------------------------------------------------------------------------------
Note the Cloud IP address for the load balancer. That’s the IP the clients will
use to access CockroachDB (the DNS record for that is
cip-rycr6.gb1.brightbox.com if you prefer).
Generate certificates
CockroachDB uses x509 certificates for authentication, so every server and client requires a certificate signed by a trusted authority. We’ll create an authority here to use specifically for the cluster and tell CockroachDB to trust it.
Create a certs and a private directory:
$ mkdir certs privateCreate a certificate authority key pair
This key pair is used to sign all the other certificates, so is the ultimate authority.
$ cockroach cert create-ca --certs-dir=certs --ca-key=private/ca.keyThis will create the certificate in certs/ca.crt and the key in
private/ca.key. Keep the key safe and don’t distribute it to any of the
servers or clients.
Create a root client key pair
To connect to CockroachDB and manage it we need a key pair for a special client
named root. So create that too:
$ cockroach cert create-client root --certs-dir=certs --ca-key=private/ca.keyThis will create client.root.crt and client.root.key in your certs/
directory and sign it with the authority key.
Create key pairs for each server
We need to create a key pair for each of the CockroachDB servers.
For each server, note the names and IP addresses:
$ host srv-qsscs.gb1.brightbox.com
srv-qsscs.gb1.brightbox.com has address 10.241.202.194

$ host ipv6.srv-qsscs.gb1.brightbox.com
ipv6.srv-qsscs.gb1.brightbox.com has IPv6 address 2a02:1348:17c:72b0:24:19ff:fef1:cac2
Then create a certificate and key for it. Ensure you specify all the names you might refer to it as, including the short names, the fully qualified name and the Cloud IP addresses and names for the load balancer:
$ cockroach cert create-node --overwrite --certs-dir=certs --ca-key=private/ca.key \
    srv-qsscs srv-qsscs.gb1.brightbox.com 10.241.202.194 \
    ipv6.srv-qsscs.gb1.brightbox.com 2a02:1348:17c:72b0:24:19ff:fef1:cac2 \
    cip-rycr6.gb1.brightbox.com 109.107.39.127 \
    localhost 127.0.0.1
This creates the files certs/node.crt and certs/node.key. Upload those, the
root client key pair and the authority certificate to the server:
$ ssh ubuntu@ipv6.srv-qsscs.gb1.brightbox.com mkdir -v certs
mkdir: created directory 'certs'

$ scp -p certs/* ubuntu@ipv6.srv-qsscs.gb1.brightbox.com:certs/
ca.crt                                        100% 1111    35.5KB/s   00:00
client.root.crt                               100% 1103    38.2KB/s   00:00
client.root.key                               100% 1679    54.0KB/s   00:00
node.crt                                      100% 1338    44.2KB/s   00:00
node.key                                      100% 1675    46.0KB/s   00:00
Do this for each of the servers, creating a new certificate and key each time and uploading it to the server.
Start CockroachDB on the first server
SSH into the first server and download and install the CockroachDB binary:
$ ssh ubuntu@ipv6.srv-qsscs.gb1.brightbox.com

ubuntu@srv-qsscs:~$ curl -s https://binaries.cockroachdb.com/cockroach-v1.0.3.linux-amd64.tgz | sudo tar -x --strip=1 -C /usr/local/bin
Then we start CockroachDB, specifying the location of certificates and the address at which other nodes can reach it:
ubuntu@srv-qsscs:~$ cockroach start --background  --certs-dir=certs --advertise-host=srv-qsscs

build:      CCL v1.0.3 @ 2017/07/06 17:46:06 (go1.8.3)
admin:      https://srv-qsscs:8080
sql:        postgresql://root@srv-qsscs:26257?sslmode=verify-full&sslrootcert=certs%2Fca.crt
logs:       /home/ubuntu/cockroach-data/logs
store[0]:   path=/home/ubuntu/cockroach-data
status:     initialized new cluster
clusterID:  259b8f67-c18b-44bb-8abd-80b2dcdadb8e
nodeID:     1
Add the other servers to the cluster
The cluster is actually now live and operational but contains only a single server. So next we want to scale the cluster by joining the other servers to the cluster.
So we SSH into the second server and install the CockroachDB binary but this
time, we tell cockroach to join the cluster on the first server using the
--join option:
$ ssh ubuntu@ipv6.srv-cgjl1.gb1.brightbox.com

ubuntu@srv-cgjl1:~$ curl -s https://binaries.cockroachdb.com/cockroach-v1.0.3.linux-amd64.tgz | sudo tar -zx --strip=1 -C /usr/local/bin

ubuntu@srv-cgjl1:~$ cockroach start --background --certs-dir=certs --advertise-host=srv-cgjl1 --join=srv-qsscs
And we do this again for the third server.
Test your cluster
CockroachDB replicates and distributes data for you behind-the-scenes and uses a Gossip protocol to enable each node to locate data across the cluster.
To test this, use the built-in SQL client as follows:
SSH to your first node and launch the built-in SQL client and create a database:
ubuntu@srv-cgjl1:~$ cockroach sql --certs-dir=certs
# Welcome to the cockroach SQL interface.
# All statements must be terminated by a semicolon.
# To exit: CTRL + D.
root@:26257/> CREATE DATABASE brightbox;
CREATE DATABASE
In another terminal window, SSH to another node and view the databases:
ubuntu@srv-xbhok:~$ cockroach sql --certs-dir=certs
# Welcome to the cockroach SQL interface.
# All statements must be terminated by a semicolon.
# To exit: CTRL + D.
root@:26257/> SHOW DATABASES;
+--------------------+

|      Database      |
+--------------------+
| brightbox          |
| crdb_internal      |
| information_schema |
| pg_catalog         |
| system             |
+--------------------+
(5 rows)
Use CTRL + D, CTRL + C, or \q to exit the SQL shell.
Test load balancing
The cluster should now also be available via the load balancer we created. We
can test connecting to the Cloud IP we mapped by using the --host option:
$ cockroach sql --certs-dir=certs --host=cip-rycr6.gb1.brightbox.comAnd view the cluster’s databases:
# Welcome to the cockroach SQL interface.
# All statements must be terminated by a semicolon.
# To exit: CTRL + D.
root@cip-rycr6.gb1.brightbox.com:26257/> SHOW DATABASES;
+--------------------+
|      Database      |
+--------------------+
| brightbox          |
| crdb_internal      |
| information_schema |
| pg_catalog         |
| system             |
+--------------------+
(5 rows)
As you can see, the load balancer redirected the query to one of the CockroachDB servers. You can check which node you’re connected to:
root@cip-rycr6.gb1.brightbox.com:26257/> SELECT node_id FROM crdb_internal.node_build_info LIMIT 1;
+---------+
| node_id |
+---------+
|       3 |
+---------+
(1 row)
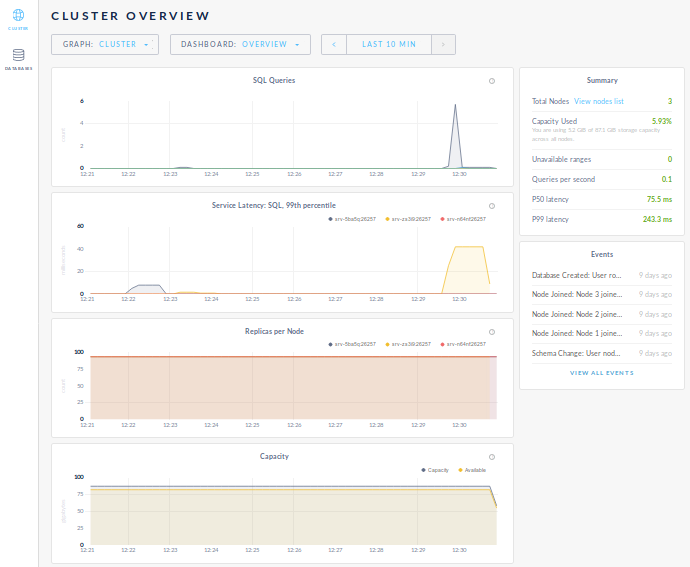
Access the Admin interface
The Admin UI is unauthenticated at present and therefore isn’t exposed directly via the load balancer. To gain access to the Admin UI securely, we can forward the port using an SSH tunnel to any of the cluster servers:
$ ssh -nNTL 8080:localhost:8080 ubuntu@srv-xbhok.gb1.brightbox.comWe can then view the cluster’s Admin UI by visiting https://localhost:8080 in
a browser.
Note that your browser will consider the CockroachDB-created certificate invalid, since it doesn’t know your certificate authority. You’ll need to click through a warning message to get to the UI.
Use the database
Now that your deployment is working, you can create your database schema, create users and grant them privileges, and connect your application.
Be sure to connect your application to the Cloud IP mapped to the load balancer, not directly to a CockroachDB node.