Deploy an app behind a Load Balancer on Kubernetes
This guide takes you through deploying an example web application on Kubernetes, using a Brightbox Load Balancer with a Let’s Encrypt certificate.
Requirements
You’ll need to have deployed a Kubernetes cluster along with our Kubernetes Cloud Controller plugin. The easiest way to do this is with our Terraform configuration.
Connect to your Kubernetes cluster
If you’re using our Terraform configuration, the master output is the public
IP address of the Kubernetes master server. You can SSH into this server using
your SSH key:
$ ssh ubuntu@$(terraform output -raw master)
Welcome to Ubuntu 18.04.4 LTS (GNU/Linux 4.15.0-111-generic x86_64)
Last login: Thu Jul 16 09:48:47 2020 from 86.31.15.94
And use kubectl on the master to inspect the cluster:
$ kubectl get nodes

NAME        STATUS   ROLES    AGE     VERSION
srv-4dbz0   Ready    master   16m     v1.18.5
srv-5z9pu   Ready    worker   2m20s   v1.18.5
srv-hrgv1   Ready    worker   14m     v1.18.5
srv-rmfdx   Ready    worker   13m     v1.18.5
See here we have one master server and three workers.
Deploy the application
First we’ll create a deployment, which will handle creating and managing a pod for our application. We’ll use an example “hello world” rails app image that runs a rails http server and listens on port 3000.
First create a namespace called example:
$ kubectl create namespace example
namespace/example created
Then let’s define the application deployment in a file called
hello-world-deployment.yaml:
apiVersion: apps/v1
kind: Deployment
metadata:
  name: hello-world
  namespace: example
spec:
  replicas: 1
  selector:
    matchLabels:
      app: hello-world
  template:
    metadata:
      labels:
        app: hello-world
    spec:
      containers:
        - name: app
          image: brightbox/rails-hello-world
          ports:
            - name: web
              containerPort: 3000
              protocol: TCP
and create it with kubectl:
$ kubectl create -f hello-world-deployment.yaml
deployment.apps/hello-world created
And you can confirm the deployment exists and is deploying the app:
$ kubectl -n example describe deployments

Name:                   hello-world
Namespace:              example
CreationTimestamp:      Thu, 16 Jul 2020 10:00:04 +0000
Labels:                 <none>
Annotations:            deployment.kubernetes.io/revision: 1
Selector:               app=hello-world
Replicas:               1 desired | 1 updated | 1 total | 1 available | 0 unavailable
StrategyType:           RollingUpdate
MinReadySeconds:        0
RollingUpdateStrategy:  25% max unavailable, 25% max surge
Pod Template:
  Labels:  app=hello-world
  Containers:
   app:
    Image:        brightbox/rails-hello-world
    Port:         3000/TCP
    Host Port:    0/TCP
    Environment:  <none>
    Mounts:       <none>
  Volumes:        <none>
Conditions:
  Type           Status  Reason
  ----           ------  ------
  Available      True    MinimumReplicasAvailable
  Progressing    True    NewReplicaSetAvailable
OldReplicaSets:  <none>
NewReplicaSet:   hello-world-55bdc6fd44 (1/1 replicas created)
Events:
  Type    Reason             Age   From                   Message
  ----    ------             ----  ----                   -------
  Normal  ScalingReplicaSet  111s  deployment-controller  Scaled up replica set hello-world-55bdc6fd44 to 1
The deployment has created a pod:
$ kubectl -n example get pods
NAME                           READY   STATUS    RESTARTS   AGE
hello-world-55bdc6fd44-mg5ss 1/1 Running 0 2m58sSo now the application is running and is reachable on an internal IP, from within the cluster. You can get the pod IP address and connect to port 3000 from the master and you’ll get a response:
$ kubectl -n example get pods -o wide
NAME                           READY   STATUS    RESTARTS   AGE     IP              NODE        NOMINATED NODE   READINESS GATES
hello-world-55bdc6fd44-mg5ss   1/1     Running   0          5m15s   192.168.228.1   srv-5z9pu   <none>           <none>

$ curl -I http://192.168.228.1:3000
HTTP/1.1 200 OK
Set-Cookie: _hello_world_session=...
X-Request-Id: e108ce2d-bd7d-43d5-943a-5037e203157c
X-Runtime: 0.002707
But it’s not reachable from outside the cluster. That’s where a Load Balancer comes in.
Expose the app using a Load Balancer
Let’s define the load balancer service with a file called hello-world-service.yaml:
kind: Service
apiVersion: v1
metadata:
  name: hello-world
  namespace: example
  annotations:
    service.beta.kubernetes.io/brightbox-load-balancer-healthcheck-request: /
spec:
  type: LoadBalancer
  selector:
    app: hello-world
  ports:
    - name: http
      protocol: TCP
      port: 80
      targetPort: web
and create the service with kubectl:
$ kubectl create -f hello-world-service.yaml
service/hello-world createdWithin a minute, the load balancer should be confirmed up and running:
$ kubectl -n example get services
NAME          TYPE           CLUSTER-IP      EXTERNAL-IP                                                       PORT(S)        AGE
hello-world   LoadBalancer   172.30.58.185   cip-109-107-40-10.gb1.brightbox.com,cip-9fx19.gb1.brightbox.com   80:31473/TCP   46s
We can see Kubernetes has created the load balancer and mapped a new Cloud IP address to it.
And now your app is reachable from anywhere:
$ curl -I http://cip-9fx19.gb1.brightbox.com
HTTP/1.1 200 OK
Set-Cookie: _hello_world_session...
X-Request-Id: 7df7456e-1a3e-4599-b541-28e918f1fb36
X-Runtime: 0.002784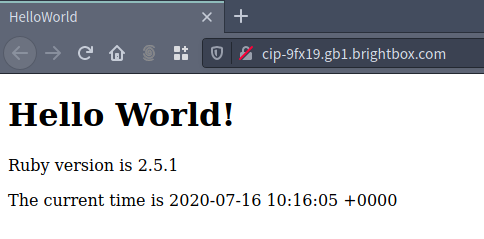
And via IPv6 of course, as our Cloud IP addresses are both IPv4 and IPv6 now:
$ host cip-9fx19.gb1.brightbox.com
cip-9fx19.gb1.brightbox.com has address 109.107.40.10
cip-9fx19.gb1.brightbox.com has IPv6 address 2a02:1348:ffff:ffff::6d6b:280a
$ curl -I http://[2a02:1348:ffff:ffff::6d6b:280a]
HTTP/1.1 200 OK
Set-Cookie: _hello_world_session...
X-Request-Id: 8cbc90ab-65f4-4203-8a2d-8ae48bd1f512
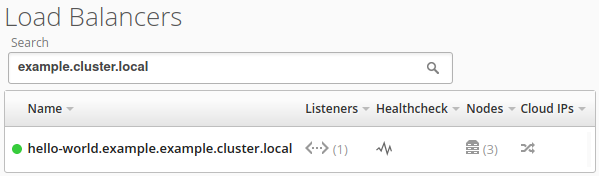
X-Runtime: 0.002928And you can see the load balancer in Brightbox Manager, named so you can recognise it as part of the Kubernetes cluster:
Enabling SSL with a Let’s Encrypt certificate
Now let’s enable SSL acceleration on the Load Balancer and have it get a Let’s Encrypt certificate for us.
Firstly you’ll need to point a domain name at the cloud IP. In this example, the
allocated Cloud IP is cip-9fx19 (109.107.40.10). So I’ve setup helloworldexample.fdns.uk to
resolve to that IP.
Then we need to modify the hello-world service and make some changes. Firstly add a listener on port 443, then add a couple of annotations. One to tell the load balancer which Cloud IP to use and another to specify the domain name. If you want to specify multiple domains for the certificate, just comma separate them here.
kind: Service
apiVersion: v1
metadata:
  name: hello-world
  namespace: example
  annotations:
    service.beta.kubernetes.io/brightbox-load-balancer-healthcheck-request: /
    service.beta.kubernetes.io/brightbox-load-balancer-cloudip-allocations: cip-9fx19
    service.beta.kubernetes.io/brightbox-load-balancer-ssl-domains: helloworldexample.fdns.uk

spec:
  type: LoadBalancer
  selector:
    app: hello-world
  ports:
    - name: http
      protocol: TCP
      port: 80
      targetPort: web
    - name: https
      protocol: TCP
      port: 443
      targetPort: web
Then just apply it:
$ kubect apply -f hello-world-service.yaml
service/hello-world configured
And check on it to see the new port has been added:
$ kubectl -n example get services
NAME          TYPE           CLUSTER-IP      EXTERNAL-IP                                                       PORT(S)                      AGE
hello-world   LoadBalancer   172.30.58.185   cip-109-107-40-10.gb1.brightbox.com,cip-9fx19.gb1.brightbox.com   80:31473/TCP,443:30861/TCP   41m
And you’ll be able to reach the service via HTTPS now:
$ curl -I https://helloworld.fdns.uk
HTTP/1.1 200 OK
Set-Cookie: _hello_world_session...
X-Request-Id: 0859268d-168d-4ca2-9297-2bf4dc2118a0
X-Runtime: 0.003849
And you don’t even have to think about expiring certificates as the Brightbox Load Balancer service will handle renewing the certificate it automatically!
Scale it up
Finally, let’s pretend our hello world application suddenly became popular and we want to add more resources for it. This Kubernetes cluster already has 3 servers, so we can scale up the deployment to 2 and double the resources available to it.
So we take the deployment, currently configured to run just 1 pod:
$ kubectl -n example get deployment
NAME          READY   UP-TO-DATE   AVAILABLE   AGE
hello-world   1/1     1            1           56m
And we tell it to scale up to 2:
$ kubectl -n example scale --replicas=2 deployment/hello-world
deployment.extensions/hello-world scaled

$ kubectl -n example get deployments
NAME          READY   UP-TO-DATE   AVAILABLE   AGE
hello-world   1/2     2            1           58m
A second pod starts building:
$ kubectl -n example get pods
NAME                           READY   STATUS              RESTARTS   AGE
hello-world-55bdc6fd44-mg5ss   1/1     Running             0          58m
hello-world-55bdc6fd44-sdc26   0/1     ContainerCreating   0          4s
And once it’s ready, we’re done! The second pod is automatically added to the load balancer service ready to receive traffic.
Keep the Cloud IP
If the load balancer service allocates a CloudIP for you, it will keep track of it and remove it for you when the load balancer is deleted.
Sometimes that isn’t what you want. Fortunately the tracking mechanism is very simple: if the name given to the cloud IP is the same as the load balancer then it will be deleted at the same time as the load balancer.
To prevent that happening change the name of the Cloud IP via the Control Panel, the CLI or directly with the API.