Creating a Load Balancer with automatic HTTPS certificates
Brightbox Load Balancers distribute traffic to your web application across a pool of Cloud Servers for high availability and utilise remappable IPv4 addressing via our Cloud IP functionality for complete flexibility.
They can also handle the hard work of providing secure and high performance HTTPS; including automatically generating and renewing certificates.
This guide will take you through setting up a new load balancer with an integrated Let’s Encrypt certificate to handle your HTTPS traffic.
We’re assuming you’ve signed up with Brightbox and have a couple of cloud servers running your web application.
Create a Cloud IP
If you’re hosting your application directly on a Brightbox Cloud Server (or perhaps you have a Brightbox Load Balancer already) you will have a Cloud IP and should have your domains DNS resolving to it. This is fine; you can move the Cloud IP to the new load balancer when you’re ready.
Otherwise, you need to create a new Cloud IP and point the DNS for your domains
at it. First, click Cloud IPs
in the main navigation bar on the left and
click the green New Cloud IP
button on the right.
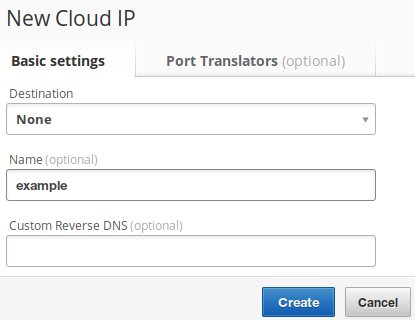
Then, give your new Cloud IP a descriptive name so you can find it later. I’m
going to use the name example here. Leave it unmapped for now by leaving the
destination as None.
Click the Create
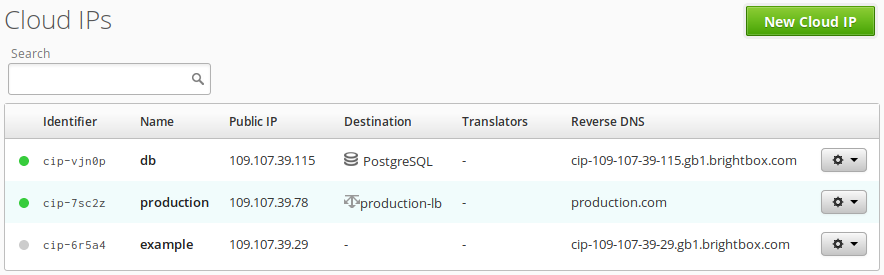
button and your new Cloud IP will appear in the list. My example Cloud IP has been given the IPv4 address of 109.107.39.29.
Then ensure that the DNS A records for your domains resolve to this new Cloud
IP. I’m going to be using the www.example.com and example.com domains so
I’ll use my DNS provider’s interface to update those A records to point to
109.107.39.29.
Ensuring a quick DNS update
If you’re changing existing DNS records, you’ll need to wait until the change fully propagates everywhere, which is dependent on your DNS TTL settings.
If your TTL is currently set high, we recommend that you lower the TTL first, to
60 seconds, and wait until that is fully propagated before changing your A
records. This ensures that switching over happens quickly so your users don’t
continue to receive the old IP address for the A record.
Create the load balancer
Log into Brightbox Manager, click Load
Balancers
in the navigation bar on the left and click the New Load
Balancer
button on right. This will display the New Load Balancer
dialog.
Basic settings
As with your Cloud IP, give your load balancer a descriptive name so you can
find it later; I’m going to use the name example again.
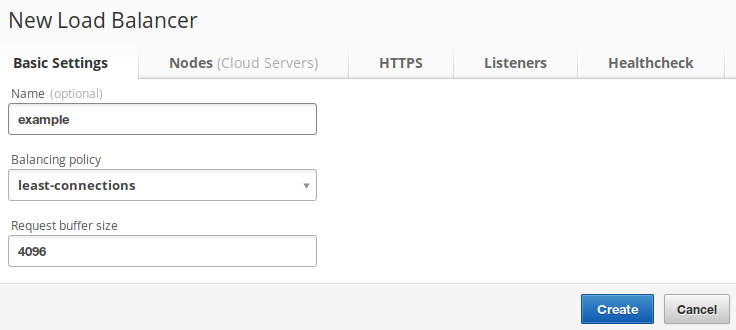
You can select a balancing policy here to control how the balancer chooses which
back-end server should get the next incoming request. least-connections is the
default so stick with that for now, but the
reference documentation
explains the other options in more detail.
You can also specify the Request buffer size
. The best size for this
depends on how big the headers are on a typical HTTP request for your
application. The default is 4096 which should be fine, but if you have very
large cookies or something unusual like that, then you may want to increase
this. Consult
the
reference documentation
for more details.
Select your back-end nodes
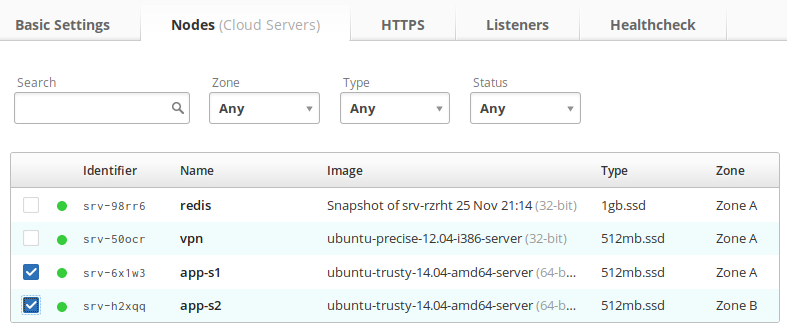
Click the Nodes
tab and you’ll see a list of your existing cloud
servers. Select the checkboxes for each of your cloud servers that runs your
application.
Setup HTTPS
Click the HTTPS
tab and select Use Let’s Encrypt for HTTPS
. This
reveals a list box into which you should enter the domains you want on the
certificate. For this example, I’m going to use example.com and
www.example.com.

You’re pretty much done with the HTTPS setup part now; it’s that easy!
Review your Listeners

Click the Listeners
tab and you’ll see a list of listeners. These are the
ports that the load balancer will listen for connections on and some related
settings. The defaults should be fine, but it’s good to understand what’s going
on in case you want to do something custom.
Each listener defines the port it’s listening on (the “in” port), the protocol it will answer with and the port it will use to connect out to your back-end servers (the “out” port).
There is a default listener on port 80, speaking HTTP and connecting out to port 80 - this allows standard HTTP access to your servers, and assumes your servers listen on port 80. Change the out port if your web server is listening on a different port. If you don’t want to serve standard HTTP at all, you can just remove the listener entirely though it’s probably not what you want to do as it will send “connection refused” errors to anyone trying!
And when using Let’s Encrypt, there is another default listener with an in port of 443 using HTTPS and connecting out to port 80. HTTPS listeners listen on HTTPS but connect out to the back-end using standard HTTP, so your backend web servers need to be serving HTTP. Again, if they’re not on the standard port 80 then change the out port.
You cannot change the in port from 443 or the protocol from HTTPS when using Let’s Encrypt as it’s necessary for the Let’s Encrypt servers to be able to validate the domains. You can add any other listeners here that you like, but you must keep the standard port 443. Any additional listeners using HTTPS will use the same certificate with the same domains.
Review the health check
By default, the load balancer will make a HTTP request to each back-end server
every few seconds to make sure they’re available. If any of them return an error,
they’ll stop being used to serve the application until the health check starts
succeeding again. You can customise the settings of the health check on the
Healthcheck
tab.
Create it
Now click the Create
button and your new load balancer will be built.
Map the Cloud IP
At this point, you’ll have a new load balancer but without a Cloud IP, which
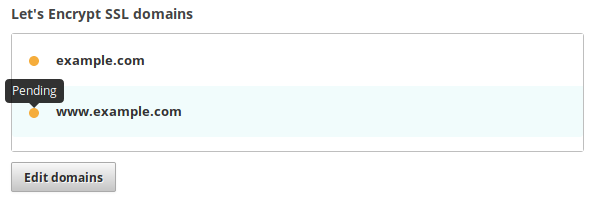
means the Let’s Encrypt validation process has not yet been started. If you edit
your load balancer you’ll see your domains listed in the pending state,
signified with an orange circle icon.
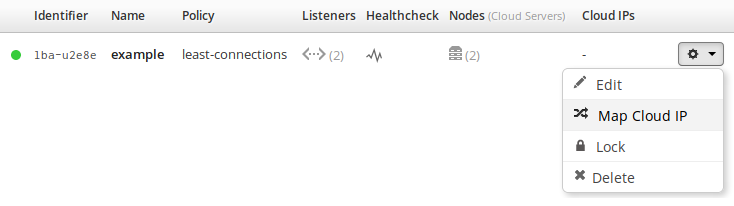
So now just map your Cloud IP to the load balancer by clicking the cog icon next
to your load balancer to bring up the action menu and select Map Cloud
IP
.
Edit your load balancer again to review the status of the domains. They should
have moved from pending to valid and turned green. This means a Let’s
Encrypt certificate has been successfully generated and the load balancer is now
serving HTTPS!
DNS problems
The most common problem you’ll have is with your DNS settings not being correct.
If your domains don’t successfully resolve to your Cloud IP, then Let’s Encrypt cannot validate them and won’t sign a certificate for them.
If your DNS servers are having a problem, or your domain doesn’t exist, the
error will say domain could not be resolved.
If your DNS records aren’t set to the correct IP address, or the old IP is still
cached due to high TTL then the error will say domain does not resolve to a Cloud IP
connected to this load balancer.
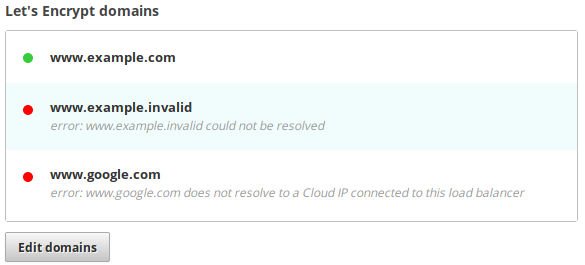
If you have several domains listed and some are valid and some are invalid, a certificate will be generated containing the valid ones. So the load balancer will serve requests for the domains that are valid.
Edit the load balancer and correct the problem domains, then click Update
and the validation will run again and any newly validated domains will be added
to the certificate.
To force the load balancer to run the validation again, you can either remove and re-add the invalid domains or unmap and remap the Cloud IP.
Renewal
Load Balancer certificates are automatically renewed several days before their 90 day expiry date arrives. If there are any problems renewing due to DNS problems, the account owner and collaborators will receive an email notification detailing the issues.
The renewal will be retried each day and if the issues aren’t rectified by the 90 day deadline, the load balancer will skip the invalid domains and generate a new certificate containing only the remaining valid domains. This means one faulty or expired domain won’t block renewal of the certificate for the other domains.