Given the sudden importance of staying indoors, we’ve been getting a number of questions about self-hosting video conferencing services on Brightbox. So we’ve written up a guide to running Jitsi, an open source video conferencing system. It’s very easy to get up and running, and even works perfectly over IPv6 too. Ideal for remote work meetings, social meetups or running training courses. We’ve even run a music “open mic” night with it!
I’ll go through the main steps of setting it up, but at the end I’ll link to some terraform manifests that builds the whole thing automatically.
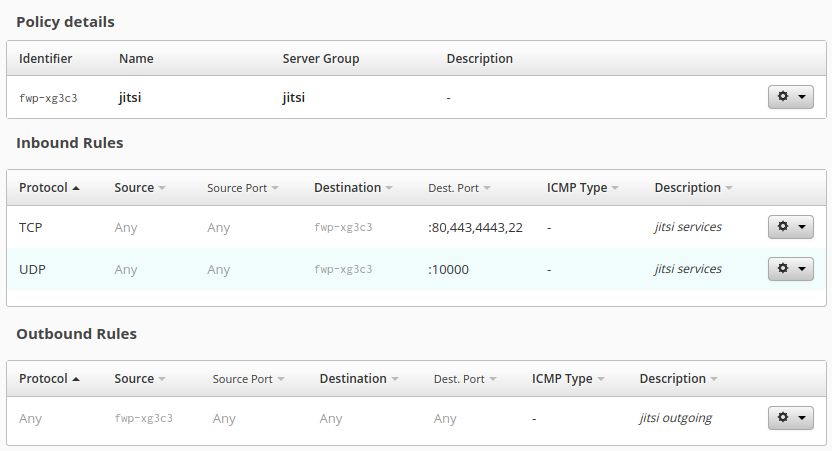
Create a new server group and call it jitsi
and create a new firewall
policy too. Add rules to the new firewall policy to allow incoming TCP
ports 80, 443, 4443, 22
and UDP
port 10000
all from source
any
.
Create a rule to allow all outgoing traffic to anywhere.
Create a new cloud server, specify the Ubuntu 18.04 (Bionic)
image and
choose a 4GB Standard SSD server
(you can probably go as low as 1GB if
you tweak the jitsi memory configs, but 4GB is best suited to the default
settings and will handle a thousand or more meeting members at a time!).
Select Assign a new Cloud IP address for me
.
Select the jitsi
server group (and remove the default
group).
Name the server jitsi
and click Create
.
Note the identifier of your new Cloud IP (it looks like cip-xxxxx
).
Using your DNS provider, create a CNAME record to point at your new Cloud IP. So for example:
meet.example.com CNAME resolving to cip-xxxxx.gb1.brightbox.com.
But if you don’t want to use your own domain name, then you can just use the Cloud IP name directly.
Once your server has finished building and booted, SSH into it (your SSH key is auto-installed on boot)
$ ssh -l ubuntu cip-at8er.gb1.brightbox.com

Welcome to Ubuntu 18.04.4 LTS (GNU/Linux 4.15.0-91-generic x86_64)

ubuntu@srv-ae819:~$$ sudo apt-add-repository 'deb https://download.jitsi.org stable/'
$ wget -qO - https://download.jitsi.org/jitsi-key.gpg.key | sudo apt-key add -$ apt-get update
$ apt-get -y install jitsi-meetDuring the installation, you’ll be asked to enter the hostname of the Jitsi Meet instance. Enter the DNS record you created above (or the Cloud IP DNS record if you’re using that instead).
Run the install-letsencrypt.sh helper script to issue an SSL certificate for
your DNS record:
$ /usr/share/jitsi-meet/scripts/install-letsencrypt-cert.sh
And you’re done! Just access your Jitsi installation at your domain name (or the
Cloud IP address https://cip-xxxxx.gb1.brightbox.com ).
The default Jitsi installation requires no authentication, so anyone can create and host conferences using your server. But you can easily tweak the config to require user logins.
Estimating bandwidth usage of something like Jitsi is a bit tricky, because it adapts to various circumstances. Users have different network capacities, different quality webcams and with a larger meeting Jitsi will focus on streaming the video of the active speakers.
And in two-person meetings, Jitsi will send traffic peer-to-peer when possible, so data doesn’t go via the server at all.
But in our experiements, if you have 10 users who all have high resolution webcams and good internet connections, expect each one to be sending around 2mbit and receiving between 2-4mbit. So a total of 20mbit incoming and perhaps 40mbit outgoing from the server. Incoming traffic is free on Brightbox and outgoing is billed at £0.06/gig, so for an hour-long meeting that would be a cost of around £1.
We’ve put together a Terraform manifest to build all this for you and even automatically configure Jitsi. You’ll need terraform installed on your local machine.
$ git clone https://github.com/brightbox/deploy-jitsi.git$ terraform init
Initializing the backend...
Initializing provider plugins...
- Checking for available provider plugins...
- Downloading plugin for provider "null" (hashicorp/null) 2.1.2...
- Downloading plugin for provider "brightbox" (terraform-providers/brightbox) 1.2.0...Create a file called terraform.tfvars and set the required variables:
# Your Brightbox account identifier
account = "acc-h3nbk"

# the email address of your Brightbox user
username = "john@example.com"

# An email address to register with Let's Encrypt for the SSL certificate
acme_email = "john@example.com"
And set a password too - we prefer to use a temporary token, which you can get from our GUI, set in the appropriate environment variable. If you have the brightbox command line client installed, it’s as simple as this:
$ export TF_VAR_password=$(brightbox token create --format=token)$ terraform apply
data.brightbox_image.bionic: Refreshing state...
...
brightbox_server_group.jitsi: Creating...
brightbox_server_group.jitsi: Creation complete after 0s [id=grp-bbbbb]
brightbox_firewall_policy.jitsi: Creating...
brightbox_server.jitsi: Creating...
brightbox_firewall_policy.jitsi: Creation complete after 0s [id=fwp-fffff]
brightbox_firewall_rule.jitsi-udp: Creating...
brightbox_firewall_rule.jitsi-out: Creating...
brightbox_firewall_rule.jitsi-tcp: Creating...
brightbox_firewall_rule.jitsi-udp: Creation complete after 0s [id=fwr-ccccc]
brightbox_firewall_rule.jitsi-tcp: Creation complete after 0s [id=fwr-ddddd]
brightbox_firewall_rule.jitsi-out: Creation complete after 0s [id=fwr-eeeee]
brightbox_server.jitsi: Still creating... [10s elapsed]
brightbox_server.jitsi: Creation complete after 11s [id=srv-aaaaa]
brightbox_cloudip.jitsi: Creating...
brightbox_cloudip.jitsi: Creation complete after 0s [id=cip-xxxxx]
null_resource.configure-jitsi: Creating...
null_resource.configure-jitsi: Provisioning with 'file'...
null_resource.configure-jitsi: Still creating... [10s elapsed]
null_resource.configure-jitsi: Still creating... [20s elapsed]
null_resource.configure-jitsi: Provisioning with 'remote-exec'...
null_resource.configure-jitsi: Creation complete after 2m5s [id=3219487467805708335]
Apply complete! Resources: 8 added, 0 changed, 0 destroyed.
Outputs:
jitsi_url = https://cip-xxxxx.gb1.brightbox.comAt this point, you’re good to go. But if you want to use your own domain, update
your CNAME recocord to the allocated Cloud IP name, and add a new variable to
your terraform.tfvars:
jitsi_fqdn = "meet.example.com"and re-run terraform apply. Jitsi will be reconfigured with your new DNS name
and restarted:
$ terraform apply

Terraform will perform the following actions:

  # null_resource.configure-jitsi must be replaced
-/+ resource "null_resource" "configure-jitsi" {
      ~ id       = "3219487467805708335" -> (known after apply)
      ~ triggers = { # forces replacement
            "cloudip"    = "109.107.x.x"
          ~ "jitsi_fqdn" = "cip-xxxxx.gb1.brightbox.com" -> "meet.example.com"
            "server"     = "srv-xxxxx"
        }
    }

Plan: 1 to add, 0 to change, 1 to destroy.

Apply complete! Resources: 1 added, 0 changed, 1 destroyed.

Outputs:

jitsi_url = https://meet.example.comIf you want to play with Jitsi, you can sign up for Brightbox Cloud in just a couple of minutes and use your £50 free credit to give it a go.
If instead you want us to run Jitsi for you, or anything else for that matter, we offer hands-on support and managed services too. Drop us a line.