Docker Container Registry
The Brightbox Container Registry allows you to store and access your Docker container images. All image data is stored in Orbit, our durable and highly-available object storage system. Access is controlled using Brightbox user credentials or API Clients.
Container Registry addresses looks like this:
cr.brightbox.com/acc-xxxxx/repositoryname/image:version
acc-xxxxx is your account id and repositoryname is an arbitrary name you can
choose. You can have multiple repositories on an account (they map to Orbit
storage containers). image is optional, so you can just use repositoryname
directly as the image name too.
Setup a repository
Let’s setup our first repository called myapp. We’ll use our user credentials
to authenticate, as users have read and write access to Orbit containers by
default.
Create the repository
Log into the Control Panel, click Docker
Registry
in the navigation bar, click Create Repository
and create a
repository named myapp:
You’ll then be shown the repository editor where you can setup the access control. For now we’ll leave it as default, which is push and pull access for all the account’s users and Full API Clients.
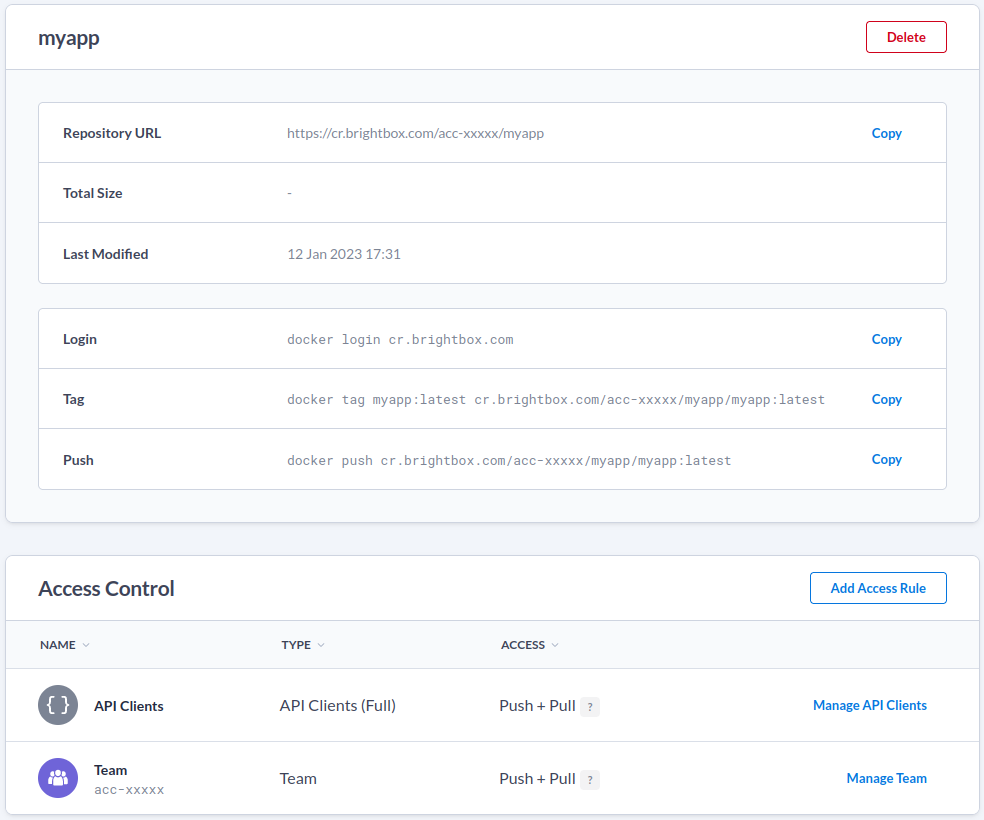
Login to the container registry
You can authenticate with the container registry using api client credentials or with your user credentials.
$ docker login cr.brightbox.com
Username: cli-xxxxx
Password: xxxxxxxxxxxx
For user credentials, you’ll need to use a temporary access token as your password here. You can generate one using our our CLI:
$ brightbox token show --format=token | docker login --username john@example.com --password-stdin cr.brightbox.comTag and push your image
Tag your image using the container registry url format:
$ docker tag myapp:latest cr.brightbox.com/acc-xxxxx/myapp/myapp:latestThen push your image:
$ docker push cr.brightbox.com/acc-xxxxx/myapp/myapp:latestSetup pull-only access
Pull-only access is often required for automated deployment systems, such as Kubernetes. To grant access to pull images, but not to push them, we use an API client and grant it read-only access to the repository.
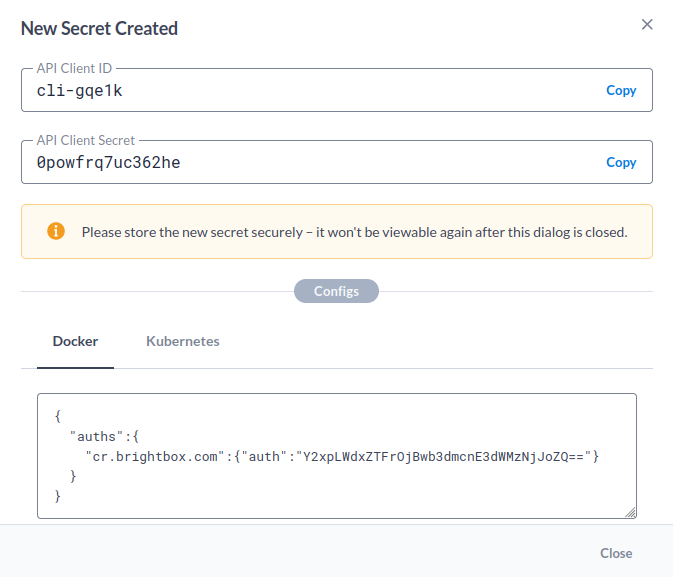
In the repository editor click Add Access Rule
and you’ll see that the
default is to create a new API Client and grant it pull access to the
repository. So choose a name and click Save
.
You’ll then be shown the new API Client’s credentials - note these down. They’re also conveniently provided in formats usable directly by the Docker daemon or by Kubernetes.
Login
As a test, use docker to login with the new API client identifier and secret and you’ll see you only have pull access and attempts to push will fail:
$ docker push cr.brightbox.com/acc-xxxxx/myapp/myapp:latest

The push refers to repository [cr.brightbox.com/acc-xxxxx/myapp/myapp:latest]
a1fb5336b21b: Preparing
0cf639c5ca08: Preparing
273c52a45c0f: Preparing
9196935b6a5c: Preparing
62068e02da20: Preparing
dcd61d2ac531: Waiting
71ce2dc7f761: Waiting
0d960f1d4fba: Waiting
unauthorized: authentication required
Public pull access
Repositories can also be made public which allows anyone to pull images. Just
add the Public Read Access
Access Rule to the repository. There is no
limit on how many repositories you create and no extra charge for them, so you
can organise your images however you like.
