Docker private registry with Orbit
This guide will take you through setting up your own private Docker image registry server running in a Docker container that stores all it’s data in Orbit, our object storage service based on OpenStack Swift.
We’ll setup some Orbit credentials and a container, then build a server to run the registry and then use it to store an image.
It’s important to note that in this example your new registry will use plain HTTP and has no kind of authentication. Newer versions of Docker won’t even let you use a remote repository like this without making changes to the docker config (it will let you use it locally on 127.0.0.1). So this is just the first step and there is additional work required before you should use this in production.
Setup the Orbit credentials
Firstly, we’ll need some credentials so the registry server can authenticate with Orbit. Applications and other systems use API clients to authenticate, so we need to create a new API client. This process is covered in more depth in the container access control guide but we’ll go over the essentials here.
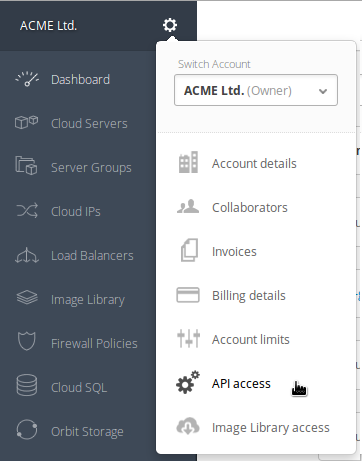
So, log into Brightbox Manager and select API Access
from the account menu, then click New API Client
.
Give your API client a useful name, such as Docker registry, and set the privileges to be Orbit Storage Only
, and click Save
.
A new API client identifier and random secret are generated and displayed here, so note them down.
Setup the Orbit container
Now we need to create an Orbit container to store the data, and grant access to the new API Client. Note that Orbit containers are like file-system directories, but for storing objects - nothing related to Docker containers.
So, click Orbit Storage
in the navigation bar on the right and click New Container
.
Give this new container a useful name, such as docker_registry.
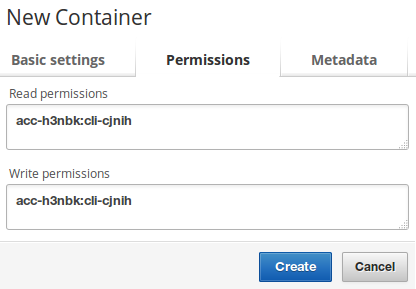
Then click the Permissions
tab where you can specify read and write permissions for the API client you created. To specify the API client, you need to prefix the api client identifier (which you noted down earlier, it looks like cli-xxxxx with your account identifier (which you can see in your browser’s URL bar, it looks like acc-aaaaa) and a colon.
The result should look like acc-aaaaa:cli-xxxxx. Enter that into both the read and write permissions boxes, and click Create
.
Again, everything up to here is just standard stuff and is covered in more detail in the container access control guide, so refer to that if you need a bit more help.
And there are more details about Orbit in the reference documentation, if you’re interested.
Build a server to run Docker
The image registry server itself runs in a Docker container, so can run anywhere you have Docker set up. The quickest way to get a Docker system going on Brightbox is to build a server running CoreOS
Just click Cloud Servers
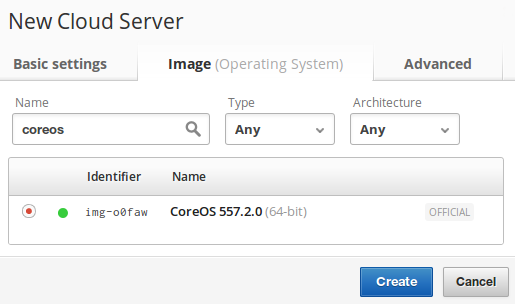
in the nav bar on the right, click New Cloud Server
, search for coreos in the Image
list and select the official
CoreOS image.
Give the server a useful name and put it in any relevant server groups and click Create
.
Map a Cloud IP
All Brightbox Cloud Servers come with IPv6 addresses by default (which you can get using the IPv6 DNS record for your server, which looks like ipv6.srv-xxxxx.gb1.brightbox.com). If you want to access your registry over the Internet using IPv4, then you need to map a Cloud IP address to it.
In the Cloud IPs
column of the server, click the link labelled Add +
which will let you create new IP and map it to the server.
Firewall policy
The default Cloud Firewall policy allows SSH and HTTP by default, but if you’ve customized your policies or groups, make sure those ports are allowed.
Run the registry in a container
We’re providing our own fork of the Docker private registry container that we’ve preconfigured to work with Orbit. You just need to give it your credentials.
So first, SSH into your new server and pull the Brightbox private repository Docker image:
$ ssh core@public.srv-xy5v4.gb1.brightbox.com

CoreOS stable (557.2.0)

core@srv-xy5v4:~$ docker pull brightbox/registry

Pulling repository brightbox/registry
e5dc70f7a9c3: Download complete
...
ed6940796042: Download complete
Status: Downloaded newer image for brightbox/registry:latest
Then start a new instance of the image, giving it the API client credentials you created, and the Orbit container name you chose. It runs on port 5000, so we’ll expose that port:
core@srv-xy5v4:~$ docker run --name registry -d -e CLIENT_ID=cli-xxxxx -e CLIENT_SECRET=therandomsecret \
    -e ORBIT_CONTAINER=docker_registry -p 5000:5000 brightbox/registry

core@srv-xy5v4:~$ docker logs registry
13/Mar/2015:16:47:24 +0000 WARNING: Cache storage disabled!
13/Mar/2015:16:47:24 +0000 WARNING: LRU cache disabled!
13/Mar/2015:16:47:25 +0000 INFO: Starting new HTTPS connection (1): orbit.brightbox.com
13/Mar/2015:16:47:25 +0000 INFO: Starting new HTTPS connection (1): orbit.brightbox.com
[2015-03-13 16:47:25 +0000] [1] [INFO] Starting gunicorn 19.1.1
[2015-03-13 16:47:25 +0000] [1] [INFO] Listening at: http://0.0.0.0:5000 (1)
[2015-03-13 16:47:25 +0000] [1] [INFO] Using worker: gevent
[2015-03-13 16:47:25 +0000] [21] [INFO] Booting worker with pid: 21
[2015-03-13 16:47:25 +0000] [22] [INFO] Booting worker with pid: 22
[2015-03-13 16:47:25 +0000] [23] [INFO] Booting worker with pid: 23
[2015-03-13 16:47:25 +0000] [24] [INFO] Booting worker with pid: 24
Push an image
Now you can push and pull images to this repository. Say you have an app with a Dockerfile, such as this example app. Just check it out and build the image:
$ git clone https://github.com/brightbox/docker-example-rails-app.git
Cloning into 'docker-example-rails-app'...
remote: Counting objects: 65, done.
remote: Compressing objects: 100% (51/51), done.
remote: Total 65 (delta 2), reused 65 (delta 2), pack-reused 0
Receiving objects: 100% (65/65), 16.32 KiB | 0 bytes/s, done.
Resolving deltas: 100% (2/2), done.
Checking connectivity... done.

$ cd docker-example-rails-app/

$ docker build .
Sending build context to Docker daemon 90.11 kB
Sending build context to Docker daemon
Step 0 : FROM ruby:2.2
3b3a4796eef1: Pull complete
...
504eb55717a5: Pull complete
Status: Downloaded newer image for ruby:2.2
 ---> 504eb55717a5
Step 1 : MAINTAINER support@brightbox.com
 ---> Running in 991481d01c79
 ---> f984aeb6b555
Removing intermediate container 991481d01c79
Step 2 : ADD . /app
 ---> 92991d417a34
Removing intermediate container 4e9785c77a17
Step 3 : WORKDIR /app
 ---> Running in e0cb788770b2
 ---> 8cfc84d57abf
Removing intermediate container e0cb788770b2
Step 4 : RUN bundle install -j3 --deployment
 ---> Running in 2dec70e02194
Fetching gem metadata from https://rubygems.org/.........
Fetching version metadata from https://rubygems.org/..
Using rake 10.4.2
Installing i18n 0.7.0
Installing minitest 5.5.1
Installing json 1.8.2
...
Bundle complete! 12 Gemfile dependencies, 55 gems now installed.
Bundled gems are installed into ./vendor/bundle.
 ---> 133271d72ca0
Removing intermediate container 2dec70e02194
Step 5 : EXPOSE 3000
 ---> Running in 8e70fcbf3215
 ---> b619764219e0
Removing intermediate container 8e70fcbf3215
Step 6 : ENTRYPOINT bundle exec rails server -b 0.0.0.0
 ---> Running in f9bb24eadec9
 ---> 26ba7a4f9705
Removing intermediate container f9bb24eadec9
Successfully built 26ba7a4f9705
Then tag the newly built image ready for pushing to the repository:
$ docker tag 26ba7a4f9705 localhost:5000/exampleapp:1.0And then push it to your repository:
$ docker push localhost:5000/exampleapp:1.0

The push refers to a repository [localhost:5000/exampleapp] (len: 1)
Sending image list
Pushing repository localhost:5000/exampleapp (1 tags)
...
26ba7a4f9705: Image successfully pushed
Pushing tag for rev [26ba7a4f9705] on {http://localhost:5000/v1/repositories/exampleapp/tags/1.0}
Search images
You can then see it on the remote repository by searching:
$ docker search localhost:5000/exampleapp

NAME                 DESCRIPTION   STARS     OFFICIAL   AUTOMATED
library/exampleapp                 0
Orbit storage
You can peek into the Orbit container directly and see the repository data stored there. Don’t modify it directly though! We have an SSH interface for convenient access; just use the same API client identifier and secret to login:
$ sftp cli-xxxxx@sftp.orbit.brightbox.com
cli-xxxxx@sftp.orbit.brightbox.com's password:
Connected to sftp.orbit.brightbox.com.

sftp> ls -lah docker_registry/docker-registry/repositories/library/exampleapp
-rw-r--r--    0 0   0   1.6K Mar 20 11:45  docker_registry/docker-registry/repositories/library/exampleapp/_index_images
-rw-r--r--    0 0   0   138B Mar 20 11:45  docker_registry/docker-registry/repositories/library/exampleapp/tag1.0_json
-rw-r--r--    0 0   0    64B Mar 20 11:45  docker_registry/docker-registry/repositories/library/exampleapp/tag_1.0
Security
As mentioned in the introduction, so far we’ve just exposed the registry using plain unencrypted HTTP and without any authentication which is not much good if you want to use it over an untrusted network. Instead of exposing the container directly, it would be better to put it behind a proxying web server that would serve it over HTTPS and enforces some authentication.
One way to achieve this is using a container running the jwilder/nginx-proxy image. Setting up authentication with this is pretty easy, but adding encryption is a little trickier, particularly because using self-signed certificates which requires the very latest version of Docker to work properly.